






Getting Started
From install to your first sale, and the settings worth knowing about. Tick each step as you go: your progress is kept in this browser. Screens are from eStorePOS 1.1.0 with Pro.
Last updated: November 11, 2026
1. Requirements
- WordPress 6.5 or later and PHP 7.4 or later
- FluentCart, installed and active
- A modern browser on a desktop, tablet or phone (Chrome or Edge for silent USB printing)
2. Install eStorePOS
In WordPress go to Plugins > Add New, search for “eStorePOS”, then Install and Activate. You can also download it from WordPress.org and upload the zip.
Install and activate FluentCart too, and set up your store in it. Your store name, logo and address on receipts come from FluentCart > Settings > Store Setup.
3. Open the register
In the WordPress admin menu open eStorePOS (it reads eStorePOS Pro once Pro is active) and click POS. The register opens full screen with your FluentCart products, categories and stock. Exit POS takes you back to the dashboard.

4. Make your first sale
- Scan a product, search for it by name or SKU, or tap it in the grid
- Change quantities in the cart, pick a customer or keep the walk-in customer
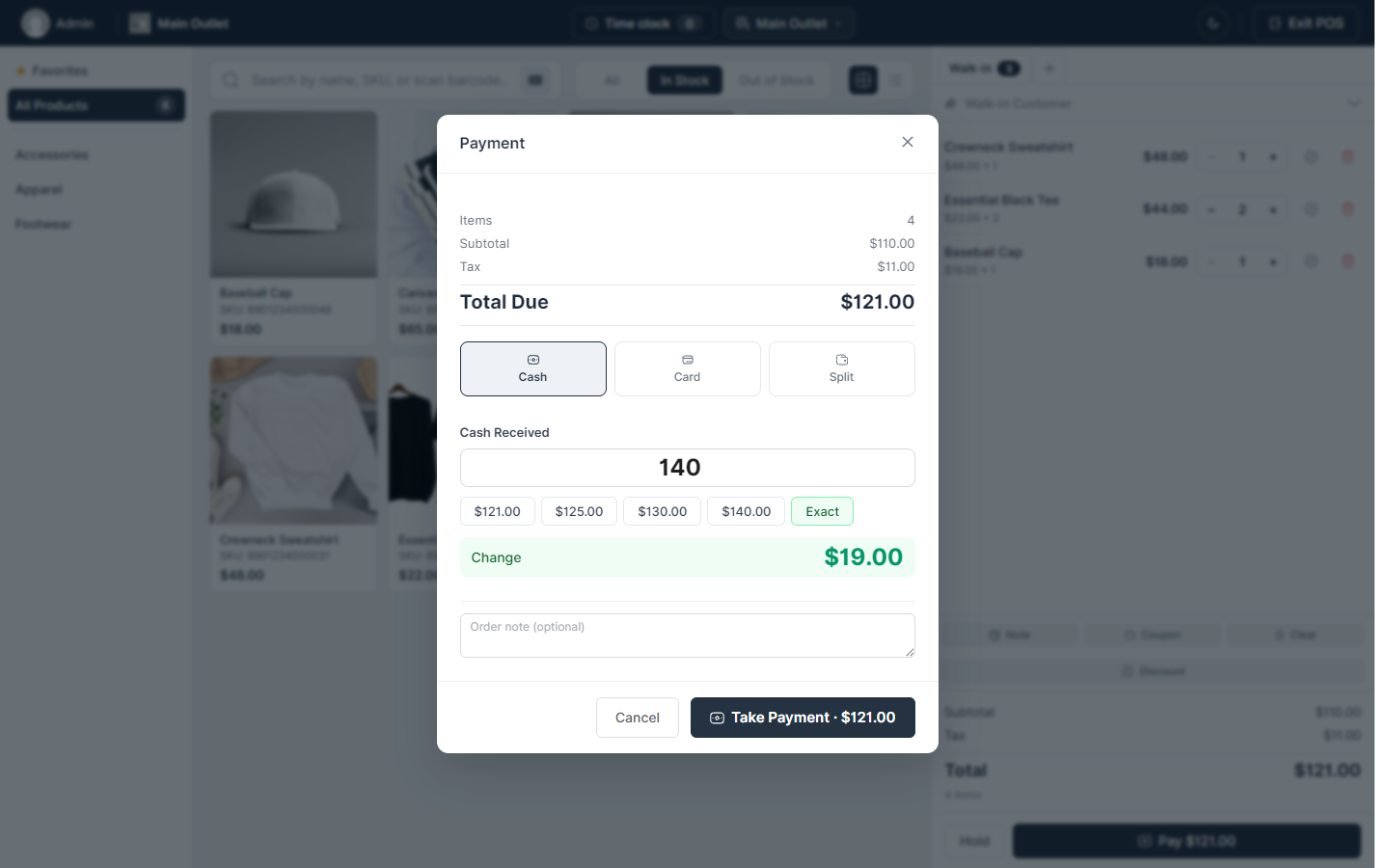
- Click Pay and choose Cash or Card (Split with Pro)
- For cash, tap a quick amount or type it; the change shows. Then Take Payment
- The sale is saved as a FluentCart order and the stock updates
5. Receipts and printers
Open Settings > Print Receipt to design the receipt: drag elements into order, switch them on or off, set the paper width, font sizes and footer text, and check the live preview.
Under Print Receipt > Printer Setup, connect a USB thermal printer for silent printing (Chrome or Edge), or enable a network printer by its IP address, then click Print test receipt. Without a printer connected, receipts open the browser’s print dialog. Auto-print on sale prints every receipt without a click.

6. Barcode scanner and cash drawer
Plug in a USB or Bluetooth scanner in keyboard mode and scan into the register’s search bar: no setup needed. The barcode button in the search bar scans with the device camera instead.
Plug the cash drawer into the receipt printer’s RJ11 port. It opens after cash sales when the printer is connected in Printer Setup; the browser print dialog cannot open a drawer. Use Open drawer in Settings > Cash Drawer to test it.
7. Barcode labels
Settings > Print Label sets what goes on a label and its exact size. To print, open Products > Print Labels, search for products, set how many of each, then Preview and Print. Products without a SKU can get one generated.

8. Online, POS or both
In Products, the Channel column decides where each product sells: Online + POS, POS only, or Online only. The same setting is in FluentCart’s product editor.

9. Upgrade to Pro
Buy a license on the pricing page, upload eStorePOS Pro under Plugins > Add New > Upload Plugin and activate it. Enter your license key in Settings > License; the same screen shows its status and lets you deactivate it to move it to another site.
Pro adds Staff, Outlets and Shifts to the menu. Switch each Pro feature on or off in Settings > Modules; turning a module off never deletes its data.

10. Get help
Read the FAQs, ask in the WordPress.org support forum, or contact us.